On the CASE: A CASE of Good Tidings

On the CASE: A CASE of Good Tidings

Welcome to this week’s On the CASE with Ann & Nicole, an endeavor undertaken with my friend and stamping buddy, Nicole Watt, of Pixel Maven’s Retreat. In “case” this is your first On the CASE visit, here is the scoop: Twice a month, on the first and third Wednesdays, we will be CASEing a card from one of Stampin’ Up!’s current catalogs. CASE means to Copy and Share with Everyone, and that is exactly what we will be doing. We hope you enjoy the cards we CASE and the free step-by-step tutorials included in our posts! Let’s get on to today’s CASE: A CASE of Good Tidings!

A CASE of Good Tidings
Page 8 – Holiday Catalog 2017

On the CASE: A CASE of Good TidingsI loved this card the moment I opened up the Holiday catalog and saw it.  There was just something about the colors and that gorgeous, bold sentiment.  Besides loving the message, I envisioned myself placing a pearl on each glorious dot.  Although this card sports no pearls, it is beautiful without them.

On the CASE: A CASE of Good GreetingsOnce again,  I picked a CASE with a lot of details and a lot of steps.  But don’t despair – I’ll provide the instructions in my step by step tutorial. Now, let’s get on the CASE!

Colors of the Day
Stamps and Papers and Inks … Oh, My!

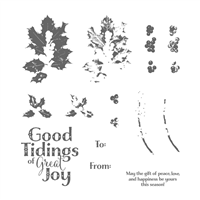
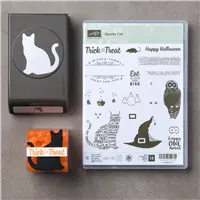
Stamps: Good Tidings
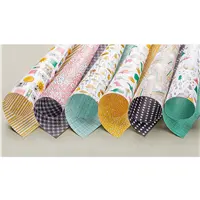
Paper:  Basic Black Cardstock (7/8″ x 3-3/8″), Cherry Cobbler Cardstock (4-1/4″ x  11″),  Whisper White Cardstock (2-3/4″ x 4-1/2″, 3-7/8″ x 5-1/8″, 11/16″ x 2-5/8″, 3-1/2″ x 2-1/2″, , Pick a Pattern Designer Series Paper (2-3/4″ x 4-1/4″)
Inks: Basic Black Archival, Early Espresso, Old Olive, Real Red
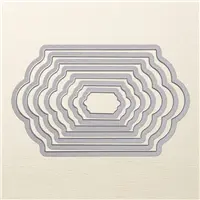
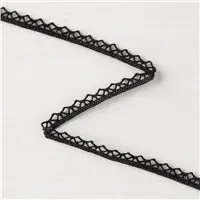
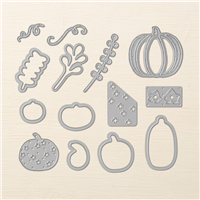
Other: Big Shot, Lots of Labels Framelits, Woodland Textured Impressions Embossing Folder, 1/2″ Circle Punch, Paper Snips, Delicate White Doilies, 5/8″ Burlap Ribbon, Vintage Crochet Trim, SNAIL Adhesive, Stampin’ Dimensionals, Tear & Tape Adhesive

“On the CASE” Notes
Your Step-by-Step Guide

1.  Score the Cherry Cobbler cardstock at 5-1/2″ to create the card base.  (Real Red is also an option, but I opted for the richness of Cherry Cobbler.)

2.  Using the 1/2″ circle punch, punch half circle out of each corner of the Whisper White cardstock.

On the CASE: A CASE of Good Greetings

3.  Emboss this white panel using the Woodland Textured Impressions Embossing Folder, and then adhere to the card base.

On the CASE: A CASE of Good Greetings

4.  Adhere the Designer series Paper panel, offsetting it to the right.

5.  Ink the large sentiment in Basic Black and stamp onto Whisper White cardstock.  Die cut using the second largest Lots of Label Framelit, labeled #6 in the second photo below.

On the CASE: A CASE of Good Greetings

On the CASE: A CASE of Good Greetings

6.  Cut off the bottom as indicated below.

On the CASE: A CASE of Good Greetings

7.  Cut a section of the paper doily as shown and adhere to the bottom of the sentiment.

On the CASE: A CASE of Good Greetings

On the CASE: A CASE of Good Greetings

Adhere to the card base.

 Note:  The Two Step stamping technique is very easy.  The stamps are labeled with letters and numbers on the plastic storage sheet. In the following steps, I reference these letters.  Although these are photopolymer stamps, you may still want to use a Stamp-a-ma-jig for more precise positioning.

8. Stamp the stem for the large holly image onto Whisper White cardstock as follows:
1e – Early Espresso, stamped off once
1f – Early Espresso

9.  Stamp the large holly leaves and berries as follows:
1a – Old Olive, stamped off once
1b – Old Olive
1c – Real Red, stamped off once
1d – Real Red

On the CASE: A CASE of Good Greetings

Snip out the completed image.

On the CASE: A CASE of Good Greetings

10.  Stamp the small holly leaves and berries as follows:
2a – Old Olive, stamped off once
2b – Old Olive
2c – Real Red, stamped off once
2d – Real Red

On the CASE: A CASE of Good Greetings

Snip out the completed image.  Using a Stampin’ Dimensional, adhere to the card as shown.

On the CASE: A CASE of Good Greetings

11.  Create a banner from the strip of Basic Black cardstock.  Snip each end into a “V”.  Adhere to the card and add the large holly image on top.  Add a strip of Tear & Tape adhesive.

On the CASE: A CASE of Good Greetings

12.  Add a snippet of 5/8″ Burlap Ribbon and a snippet of  Vintage Crochet Trim.  Use more Tear & Tape Adhesive, if needed.

13.  Ink the sentiment in Basic Black and stamp onto Whisper White cardstock.  Snip the ends into a “V” and adhere over the top of the ribbons.  Note:  If you look closely at the sample, they stitched through the middle of the sentiment and probably the ribbons, too.  However, having just sold my sewing machine at my “down-sizing, de-cluttering, hopefully-getting-ready-to-move yard sale” this past weekend, stitching was not an option for me.  Tear & Tape Adhesive works great and forms a strong bond.

On the CASE: A CASE of Good Greetings

How Hard Was It to Crack this CASE

It seems I am attracted to cards that have lots of  layers and lots of  details, and this card is no exception.   However, each step is simple.  Two Step stamping is an easy technique that yields amazing results, as you can see with this card.  If you have never done it before, I encourage you to try it!  Difficulty Level:  Because of the time invested, I scored this card 3 out of 5

#SUontheCASE

Nicole and I hope our projects today inspire you to try CASE-ing the catalog, too! We’ll be “on the case”, looking for the hashtag #SUontheCASE on social media (Facebook, Twitter, Instagram, Google+ & Pinterest). If we find one of your projects, we’ll share it, like it, repost it – we’ll do it all!

Now head on over to Nicole, the Pixel Maven, to see the CASE file she has been working on from the Annual Catalog.  Nicole always writes the BEST tutorials!  You will love what she has created for you! And remember, if you have any questions about the cards I create or the techniques I use, I am only an email away. Until next time – CASE away!

Would you like to check out the most recent Cold CASE Files?  Try these:

A CASE of Nature Sings
A CASE of Snowflake Sentiments
A CASE of Gourd Goodness
The CASE of the Sheltering Tree
The CASE of the Beautiful Bouquet
The CASE of the Birthday Blooms

Ready to get On this CASE?  If you would like to try your hand at creating your own CASE of Good Tidings,  the supply list is located below.  Clicking on a product takes you right to my store.

Let the Sales Begin

FREE!  Use my exclusive Host Code for October and get a FREE gift with a $50 purchase.  You won’t want to miss out on FREE Striped Treat Bags from me!

Let the Sales Begin

To qualify, place a $50 or more product order (total before shipping and tax) through me using the host code above by October 31st (11:50 p.m. Mountain).

ORDERS OF $150 OR MORE (before shipping and tax) should not add the code and will automatically earn the Striped Treat Bags.

The Treat Bags will arrive separately from your order in mid-November or sooner.

Looking for a Retired Stampin’ Up! stamp set? Check out my list.  Over 100 sets available.  Prices were reduced on many items on October 16th.

For the latest offers and specials from Stampin’ Up!, check out the latest edition of Tuesday Newsday!

siggy-1

Price: $110.00

Tuesday Newsday – Weekly Round-Up

Tuesday Newsday

It’s Tuesday Newsday, and time for the latest specials and offers from Stampin’ Up!

Let’s face it – Who doesn’t love Designer Series Paper and who doesn’t love an incredible Sale.  Back by popular demand is Stampin’ Up!’s Designer Series Paper Sale.  Buy three packages of select Designer Series Paper and get one FREE during the month of October! This sale includes Designer Series Paper from both the annual and holiday catalogs, including select Specialty and Designer Series Paper Stacks!

Tuesday Newsday

Tuesday Newsday

Hey, Paper Pumpkin Fans – my October Paper Pumpkin arrived today . It was packaged in the cutest green and black gingham box, just like the box in the picture above.  As you know, the October and November kits are a coordinated set.  If you missed signing up for the October kit, don’t despair.  Become one of my Paper Pumpkin subscribers and order the October kit out of my Online Store when it becomes available.  Sign Up HERE.

  • Remember, the October and November kits coordinate but they also stand alone. You DO NOT need both kits to create a complete project.
  • Remember, to receive November’s kit, you must must subscribe HERE by 11:50 PM (MT) on November 10.

Tuesday Newsday

There is still time to earn the amazing Merry Patterns stamp set.  Here are the details:

  • The Merry Patterns Stamp Set is exclusive to this promotion and will not be available after October 31
  • In order to qualify for this amazing stamp set, place an online order or hold a qualifying workshop of $300 before shipping and handling.
  • There is no limit to the number of times the Merry Patterns Stamp Set may be earned, but only one set can be redeemed per qualifying order
  • Orders before 11:50 PM (MT) on October 31
  • The Merry Patterns Stamp Set is in addition to Stampin’ Rewards!

Tuesday Newsday

Tuesday Newsday

On November 1st, you will be saying  hello to a new world of colorful creativity! Meet Stampin’ Blends, artist-quality alcohol markers in 12 exclusive Stampin’ Up! colors. To cover all the blending bases, Stampin’ Up! is  also offering a limited-time 16-card project kit and stamp set with beautiful line-art images.

  • Add just the right amount of color where you need it with the brush tip or fine-point.
  • Each color (except Ivory and Bronze) has a light and dark shade marker, available individually or in a combo pack.
  • Press fit seal prevents air from entering the barrel and causing evaporation.
  • The nestable lids are easy to keep track of and have a tight fit for long-lasting color.

Ready to learn more?  Check out this video!

Check out the amazing line-up of products in this brochure!

Tuesday Newsday

Click HERE to open.

Tuesday Newsday

FREE!  Use my exclusive Host Code for October and get a FREE gift with a $50 purchase.  You won’t want to miss out on FREE Striped Treat Bags from me!

Let the Sales Begin

To qualify, place a $50 or more product order (total before shipping and tax) through me using the host code above by October 31st (11:50 p.m. Mountain).

ORDERS OF $150 OR MORE (before shipping and tax) should not add the code and will automatically earn the Striped Treat Bags.

The Treat Bags will arrive separately from your order in mid-November or sooner.

Looking for a Retired Stampin’ Up! stamp set? Check out my list.  Over 100 sets available.  New, reduced prices!

As always, if you  have any questions, I am only an email away! Until next time…

siggy-1

The Stamp Review Crew: Spooky Cat Edition

The Stamp Review Crew: Spooky Cat Edition

It’s time for the Stamp Review Crew: Spooky Cat Edition!  If this is your very first visit to one of our hops, The Stamp Review Crew is a group of international Stampin’ Up! demonstrators whose mission is to do a blog hop on the first and third Mondays of each month. Our hops are unique because each of us features the same stamp set used in a variety of ways,  giving you loads of inspiration for that set! The hops are archived at the Stamp Review Crew blog.  You will be able to click through each hop at any time, going directly to the posts for that hop whenever you want! This week we are featuring the Spooky Cat stamp set.  I am Stop #4 on the hop.  If you are following along in order, you just arrived from Stop #3:  Stesha Bloodhart.  She is so inspiring! After visiting me, you will continue to Stop #5, Natalie Lapakko.  You will love what she has in store for us!  Enjoy today’s hop!

The Stamp Review Crew: Spooky Cat Edition

The Stamp Review Crew: Spooky Cat Edition

I LOVE creating Halloween cards! I LOVE candy! So what could be better than creating a Treat Tube holder card that combines my love of both candy and Halloween?  This was an especially  sweet deal for me.  Since I wanted to use only orange M & M’s to fill my Treat Tubes, I was compelled to eat the other colors to keep them from cluttering up my work space.  A girl has to do what a girl has to do!

I wish I could claim the honor of having designed the holder itself.  I have never been capable of coming up with the right places to score, snip and fold.  Although there are several variations of this holder,  I got my directions from a super talented member of my downline, Beth McCullough, of Stamping Mom fame.

Making the holder is as easy as 1 -2 – 3!

  1.  Cut a sheet of cardstock 4″ x 9-7/8″.
  2.  Score at 4″, 4-5/8″ and 5-1/4″.
  3.  Cut slits between the two outermost score lines at 1-1/2″ and 2-1/2″ from the top of the card.
Colors of the Day
The Stampin’ Schach Design Tips

Spooky Night Designer Series Paper is responsible for the cuteness factor of this card. I selected the yummy Very Vanilla and Basic Black polka dot paper as my background, matted it onto Pumpkin Pie card stock, and adhered it to the base.  It gave the card a vintage vibe, I think.

The Stamp Review Crew: Spooky Cat Edition

I then selected the 2-5/8″ Layering Circles framelit, and die cut the moon from the Tree Branch pattern.  This was popped onto the card using Stampin’ Dimensionals.

Because I wanted there to be more dimension, I fussy cut the branches out from another section of the Tree Branch paper, and adhered it to the card, offsetting it slightly so the branches from the circle showed up.

The Stamp Review Crew: Spooky Cat Edition

The cat was then stamped, punched, and popped up on dimensionals. To increase the contrast between the cat and the moon, the edges were distressed with Basic Black ink.

The Stamp Review Crew: Spooky Cat Edition

Patterned Pumpkin thinlits were used to cut pumpkins from the Spooky Night Pumpkin paper.

The Stamp Review Crew: Spooky Cat Edition

Of course, I just had to add a Peekaboo Peach bow, accented with Black Vintage Crochet Trim, Black Mini Sequins, and Black Metallic Thread.

The Stamp Review Crew: Spooky Cat Edition

The Treat Tube sports orange M&M’s.  Tear and Tape Adhesive holds two Bigelow Salted Caramel tea bags in place inside the holder. Yummy!

The Stamp Review Crew: Spooky Cat Edition

I hope you enjoyed today’s Treat Tube holder made with the Spooky Cat set.  Won’t you let me know in your  comment today?  Of course, if you ever have a question about the cards I create or the techniques I use, I am only an email away.  Now hop along to Stop #5Natalie Lapakko, to see what she has in store for you!  If you get lost along the way, you can find a list of all the hoppers at The Stamp Review Crew.

The Stamp Review Crew Spooky Cat Edition SRC Previous BadgeIf you would like to try your hand at creating today’s treat tube holder, the supply list is located below. Clicking on a product takes you right to my store.  Until next time…siggy-1Let the Sales BeginFREE!  Use my exclusive Host Code for October (above) and get a FREE gift from me with a $50 purchase.  This month’s gift – Striped Treat Bags!