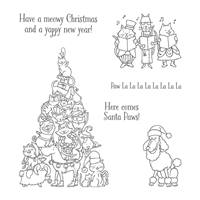
Are you ready for some more watercoloring fun? If so, what could be more fun than this delightful image from the Santa Paws stamp set. This set is one of the ones which will be retiring when we say good-by to the Holiday Catalog. Although I absolutely had to have this set – and it was one of the first ones I ordered – I waited this long to ink it up. Why I waited so long, I don’t know. Maybe it was because I thought all the details would be overwhelming. However, I will be whipping up four more of these for my very special dog loving friends! Feeling nostalgic on this warm December day, I armed myself with mellow tunes from John Denver, Cat Stevens and Seals and Croft, and watercolored the afternoon away. I hope you enjoy today’s efforts…
Colors of the Day
The Stampin’ Schach Design Tips
From Ginger Cats…

to Piebald Dogs…

this card is the cat’s meow. Every image was watercolored using Blender Pens and inks. I simply touched the tip of my Blender Pen directly to the stamp pad, and then removed excess color on a piece of scratch paper before tinting the image. Just remember, watercoloring is a lot like dieting and weight gain. It is far easier to add color, than it is to take it off. So start with a light hand, and add more color as needed.

To add more definition, I also outline using Stampin’ Write Markers, and then pull the color into the image, once again using Blender Pens.
 A few Smoky Slate snowflakes, made with an image from the Night in Bethlehem set, adds interest, and fills up white space. Because I wanted nothing to detract from my focal point, I opted to put the sentiment on the inside of the card.

As the last strains of John Denver’s “Annie’s Song” resonated in my ears, another Christmas card was added to my stash. The only problem is I want to frame one for myself to keep. SO, make that five more of these cards to whip up!
As always, if you have any questions about the cards I create or the techniques I use, don’t hesitate to email me. And please, leave me a comment to let me know what you think about today’s card. I’m thinking about adding a few sequins or rhinestones to my framed version. What do you think? Until next time…
Don’t miss out on the Santa Paws set. It is on the retiring list. Check out more retiring sets at:
 Shop today at my ONLINE STORE.

Place an online order of $50 or more (before tax and shipping) and use the December Host Code to receive a free gift from me. This month, it will be a surprise from the Occasions Catalog, which goes lives January 3, 2018. Please allow 2 – 3 weeks for your gift to be delivered.


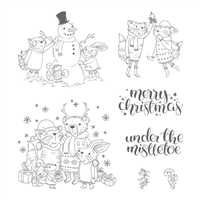
 Faux watercoloring using Blender Pens and inks is one of my favorite techniques. There is just something so relaxing about coloring, whether it is with Blender Pens, Stampin’ Blends, or Watercolor Pencils! In need of a little “me” time on this late November afternoon, I sat down, Blender Pens in hand, and engaged in a little watercoloring fun. With this cute image from Mistletoe Friends in front of me, I settled in with two old dogs at my feet, a cup of hot tea, and the TV turned to the Hallmark Movie channel. I hope you enjoy today’s card.