


![]()
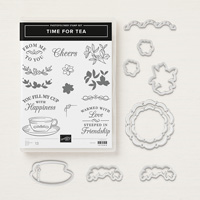
Nicole and I are back On the CASE. Our mission: To work through current Stampin’ Up! catalogs, breaking down gorgeous samples step-by-step, just for you! CASE means to Copy and Share with Everyone, and that is exactly what we do. We hope you enjoy the cards we CASE and the free tutorials included in our posts. Today’s edition features a CASE of one of the Time for Tea decorated tins.
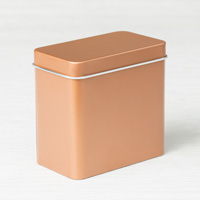
Time for Tea
Decorated Tea Tin
Annual Catalog Page 14 & 15

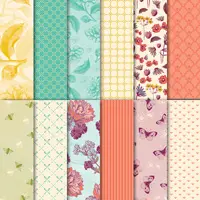
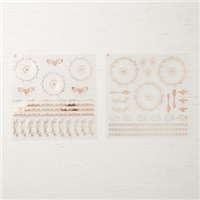
The Tea Room Suite is so feminine and dainty. The Tea Room Specialty Designer Paper combines subtle, vintage looking patterns with more vibrant patterns in Calypso Coral and Coastal Cabana. Copper accents on the coordinating ribbon and vinyl stickers add a touch of elegance. Of course, I was completely mesmerized by the copper tea tins. In fact, it is one of the tea tins which is the focus of today’s CASE. Enjoy!

Colors of the Day
Stamps and Papers and Inks … Oh, My!
Stamps: Time for Tea Bundle (includes Spot of Tea Framelits Dies)
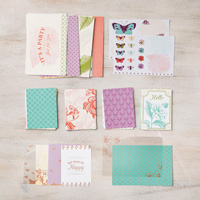
Paper: Whisper White Cardstock (scraps), Tea Room Specialty Designer Series Paper (12″ x 3-1/8″ Crushed Curry Pattern, Section of the Floral Pattern that contains the flowers shown), Tea Room Memories & More Card Pack
Ink: Old Olive, Blender Pen
Other: Big Shot, Copper Tea Tin, Tea Room Copper Vinyl Stickers, Paper Snips, SNAIL Adhesive, Stampin’ Dimensionals, Tear and Tape Adhesive
“On the CASE” Notes
Your Step-by-Step Guide
1. Adhere the designer paper to the tin using Tear and Tape Adhesive.

2. Add the vinyl sticker trim around the lid.


3. Die cut the Tea Room Memories & More sentiment card.

4. Stamp the leaves in Old Olive and color using an ink and Blender Pen.

5. Fussy cut the flowers from the Designer Series Paper, as shown.


6. Attached the leaves and the flowers to the back of the sentiment as shown using SNAIL adhesive. Next adhere the sentiment to the tin using dimensionals.
This adorable little tin will be heading off to my great-niece who recently graduated from the University of Iowa with a degree in business. She has moved to Milwaukee to pursue her new career. I will fill the tin with a variety of 4 gift cards in individual envelopes, with directions to open one each week for a month. I hope she has as much fun using them as I had selecting them!
How Hard Was It to Crack This CASE
Today’s project is easy! No problems here, for sure. Difficulty Level: 2 out of 5, only because of the fussy cutting.
#SUontheCASE
Nicole and I hope our projects today inspire you to try CASEing the catalog, too! We’ll be “on the case”, looking for the hashtag #SUontheCASE on social media (Facebook, Twitter, Instagram, Google+ & Pinterest). If we find one of your projects, we’ll share it, like it, repost it – we’ll do it all!
 Now head on over to Nicole at Pixel Maven’s Retreat to see the CASE file she has been working on. Nicole always writes the BEST tutorials! I know what she has CASED…and you will be delighted!
Ready to get On this CASE? If you enjoyed today’s decorated tin, and would like to try your hand at creating your own CASE, the supply list is located below. Clicking on a product takes you right to my store. Be sure to use this month’s Host Code. Online orders over $50 (before tax and shipping) will receive a special little somethin’-somethin’ from me IF you use the Host Code. If your order is $150 or more, please do not use the Host Code. You will automatically receive the gift from me, as well as your own Host Rewards.

August: 7V2KARM2
As always, if you have any questions about the cards I create or the techniques I use, I am only an email away. Until next time…


Beautiful! I love that you made it look so easy!
I really like your tin; no 2 are the same, are they?