
I am a pushover for Santa! Maybe it is his fluffy white beard or his jolly demeanor. Or maybe it’s the twinkle in his eye. Or could it be that he is an animal lover? After all, he does have eight reindeer! At any rate, I haven’t met a Santa that I didn’t like. So when I saw the adorable
Stampin‘ Up! set,
Jolly Old Saint Nick, I knew that I had to have it! And it works perfectly with the delightful sketch challenge at
Always Playing with Paper (Paper Players). I ho-ho-hope you will join in the fun this week!
 The Stampin‘ Schach Design Tips:
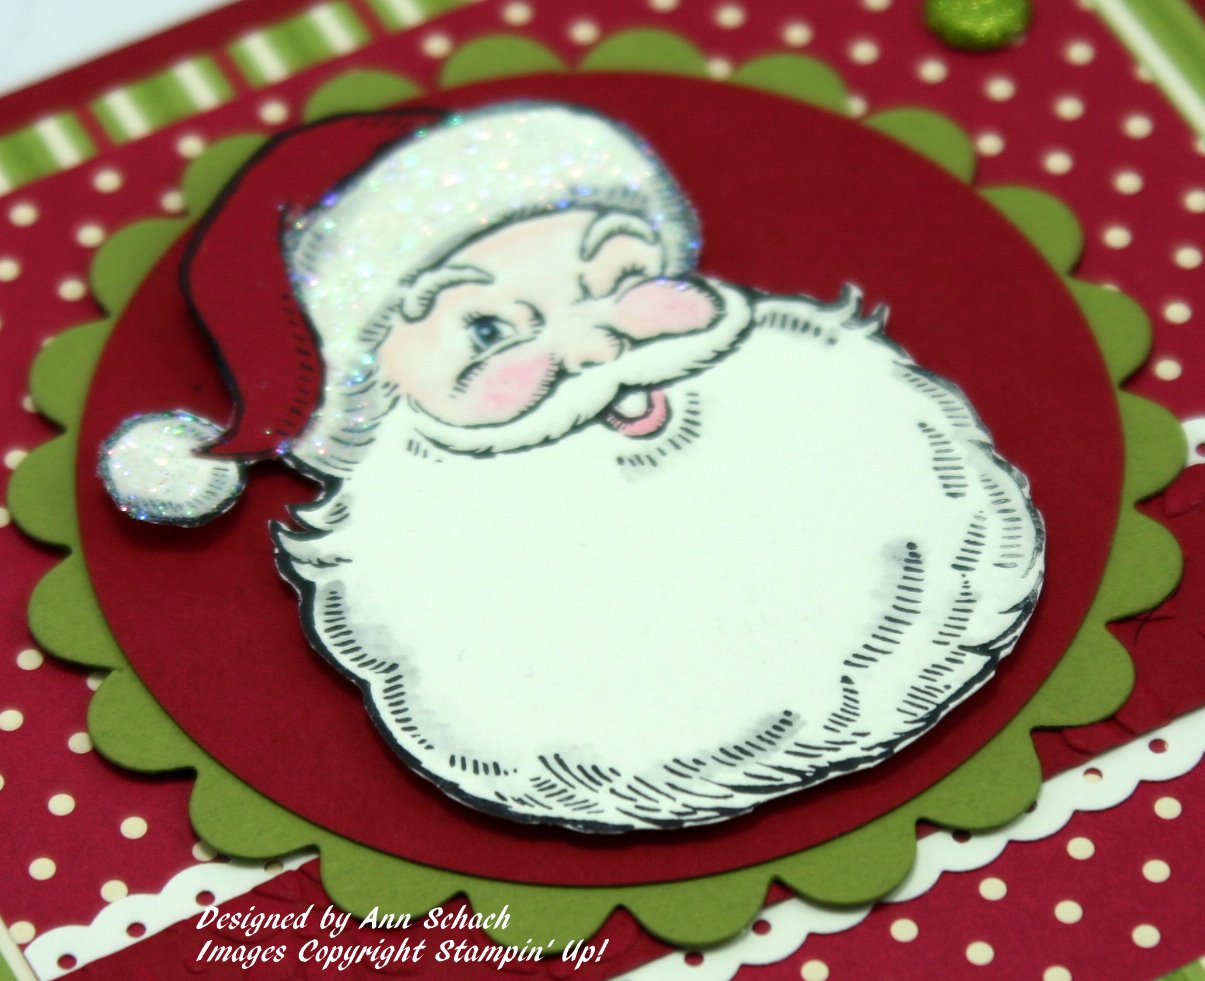
Coordination is easy when using Stampin‘ Up!’s Designer Series Papers! The adorable “Dots” and delightful “Stripes” are from the Jolly Holiday collection. Notice how nicely they pair up with Cherry Cobbler, Old Olive and Very Vanilla? Designer Series Papers take the guesswork out of which card stock to use.
Versatile punch! The embossed Cherry Cobbler panel is layered upon two Very Vanilla Dotted Scallop Ribbon Borders, giving the illusion of a paper pierced scallop border.
Paper piecing is a breeze with this stamp! Just the upper section of the “Santa” image was inked with Jet Black StazOn and stamped a second time onto Cherry Cobbler. The body of the hat was then snipped out and adhered to the full image.
Popping jolly old Saint Nick up on Stampin‘ Dimensionals places him on center stage!
Glitz and Glam! Santa looks fab in his Dazzling Diamonds fur trimmed hat! And what about those Old Olive Glimmer Brads…a NEW PRODUCT offered in the Holiday Mini! Both the hat and the brads really sparkle in person!
What a great vintage looking image! The end result reminds me of some of the Santa cards from the 1940’s and ’50’s that I have collected over the years. And doesn’t it work perfectly with today’s challenge sketch? Of course, there are lots of images that would perfectly with this sketch, and I can hardly wait to see what you create! So please head over to Always Playing with Paper Paper Players challenge for more inspiration from their talented design team.
In celebration of the changes that are in store for the Pals Paper Arts challenge blog, don’t forget that I am offering you a chance to win this yummy BLOG CANDY!

As I mentioned in yesterday’s post, you could win all of these goodies.
“Out of the Box” Hostess Set
Assorted Real Red Corduroy Buttons and Brads
Bashful Blue 1/4″ Grosgrain Ribbon
Over 50 sheets of 6″ x 6″ Designer Series Paper
You have until NOON CST on August 17th to leave your comments. I will choose a random comment and announce the winner later in the day on Tuesday, August 17th. Please note that I only ship within the United States. The winner has 24 hours to email me their name and mailing address, so stay tuned! Even if you left a comment yesterday, feel free to leave a comment on today’s post, too.
 Only four more days until we reveal the PPA’s new “personality”. Plus, my final Splitcoaststampers Dirty Dozen gallery goes live today! It is entitled “Fabulous in Faux“ and spotlights a variety of faux techniques. It has certainly been an honor to have been a member of this talented group of stampers! So as you head out today, don’t forget to leave me a comment and let me know what you think of Jolly Old Saint Nick. And as always, I will gladly answer any questions about the cards that I create or the techniques that I use. Until next time…


 Click Here to Order Stampin‘ Up! 24/7
Stamp Set: Jolly Old Saint Nick (available September 1); Ink: Jet Black StazOn (101406), Basic Gray (109120), Blush Blossom Stampin‘ Write Marker (100037), Pretty in Pink (101301); Designer Series Paper: Holly Jolly (117159); Card Stock: Very Vanilla (101650), Cherry Cobbler (119685), Old Olive (100702); Tools: Big Shot (113439), Petals-a-Plenty Textured Impressions Embossing Folder (116824), Dotted Scallop Ribbon Border Punch (119275), Scallop Circles #2 Bigz Die (113469), Circle Scissors Plus (112530), Glass Mat (112531), Blender Pens (102845); Glitz and Glam: Dazzling Diamonds Stampin‘ Glitter (102023), Old Olive Glimmer Brights Glimmer Brads (available September 1)


