


 I am always in need of thank you cards. In fact, I never have enough to meet my needs. That is why I was happy to design this one using the Painted Harvest stamp set that my husband could help me create. He LOVES embossing with the Big Shot. He’s great at cutting paper. AND he sees straight. It is common knowledge among my stamping friends that I have a knack for stamping and adhering things crookedly. This card is perfect for us to make as a couple. We can both cut. He can emboss and adhere, while I create the label, punch the leaves and add pearls. Just in case you would like to sit down with a friend and create your own version of today’s card, I’ve whipped up a Painted Harvest Thank You card tutorial for you. Enjoy!
Colors of the Day
Stamps and Papers and Inks – Oh, My!
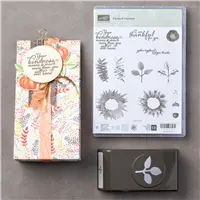
Stamps: Painted Harvest Bundle (146021), includes Leaf Punch
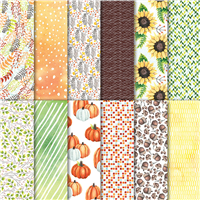
Paper: Painted Autumn Designer Series Paper (2-1/2” x 3-7/8”, 3/4” x 3-1/4”, ½” x 3”), Vanilla Cardstock (3-3/4” x 5”, 3” x 2” for sentiment, 4” x 4” for leaves), Early Espresso Cardstock (3-7/8” x 5-1/8”, 2-5/8” x 4”, 3” x 2”), Lemon Lime Twist Cardstock (4-1/4” x 11”, scored at 5-1/2” to form the card base)
Ink: Early Espresso, Garden Green, Lemon Lime Twist, Peekaboo Peach
Other: Big Shot, Layered Leaves 3D Dynamic Textured Impressions Embossing Folder, Pretty Label Punch, Paper Snips, Touches of Nature Elements, Pearl Basic Jewels, Stampin’ Dimensionals, SNAIL Permanent Adhesive, Fine Tip Glue Pen
Instructions
1. Run the Very Vanilla cardstock through the Big Shot with the Layered Leaves folder. Mat onto Early Espresso, and adhere to the card base.
2. Mat the Designer Paper onto Early Espresso and adhere to the card.
 3. Snip the ends of the Designer Paper strips to form a “V”, and adhere to the card base.
 4. Stamp the sentiment in Early Espresso. Punch out with the Pretty Label Punch. Ink the Frond image with Lemon Lime Twist. Stamp off once, then stamp onto the top and bottom edges of the sentiment label. Repeat with Peekaboo Peach, as shown.
 5. Punch an Early Espresso Pretty Label. Cut in half horizontally, and adhere behind the sentiment.
6. Stamp two Leaf Images in Lemon Lime Twist with a Garden Green overlay. Punch out. Adhere under the sentiment. Attach the sentiment with leaves to the card.
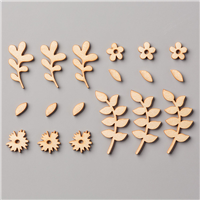
 7. Embellish with Pearls and a Touches of Nature leaf.

I love the look of Very Vanilla, Early Espresso and Lemon Lime Twist. It’s a fresh look for fall, and quite different from my usual fall color combo of Always Artichoke, Cajun Craze, and Crushed Curry. Of course, the Painted Autumn Designer Series Paper is yummy, and does include Cajun Craze, Crushed Curry, Daffodil Delight, Garden Green, Tangerine Tango and more!
I hope you enjoyed today’s card and step-by- step instructions. I hope you will let me know in your comment today. I also hope you will join me again soon as I share a cute coordinating mini-treat bag that goes with today’s card. As always, if you have any questions about the cards I create or the techniques I use, I am only an email away! Until next time…
Coming Soon: Watch for details about sales and specials beginning October 1st, including our annual designer series paper sale and a World Card Making Week sale on select items.
Check out my retired goodies! Purchase $35 worth of retired items from my list, between September 27 – September 30th, and receive 10% off (before postage)! Click HERE!


I wish Mike was more interested in the card making. Oh well, could be worse. This is so pretty. I love the pearls – what a fun touch and the wood leaves are another fun texture. I swear, everything I touch is off kilter a bit, ummm….. I wonder what that says about me?
Beautiful card, Ann! Love the layers and of course, the pearls!
Pingback: Painted Harvest Mini Treat Bag - The Stampin' Schach
Beautiful card, Ann. I love fall and all the colors and this card says it all. Thank you for the tutorial. I think it’s great you and your husband make cards together. I know what you mean about the crooked part, I have same problem. 😉
Loving all the leaves . . . from wood, to texture to pattern!
I love this card, Ann! I agree about what the Lemon Lime Twist adds! And I enjoyed hearing about how you and your husband work together!
This is such an attractive card and appears not to be difficult to make!
I need to make thank you notes so this will be perfect! Thanks for sharing the tutorial!
Diane Gil